Select Topic
How to Set up Micro Conversions
How to Set up Locations
How to Set up Macro Conversions
How to Tag Webpage Data Elements
Commodi Explicabo Deleniti Rerum
With Incendium we have two types of conversions, Macro Conversions and Micro Conversions.
Macro Conversions
Macro Conversions are the most important to your business for driving revenue. These will typically be an actual sale on an e-commerce store, an enquiry from a contact form in B2B, or a demo request, something which is either directly linked to revenue or that could lead to revenue.
Micro Conversions
Micro Conversions help us to understand behavior and engagement before a Macro Conversion happens, and that's what this lesson focuses on. Examples of Micro Conversions could be a user clicking through a set of testimonials on a page, or it could be an add to cart, or even a simple as a click on a certain button.
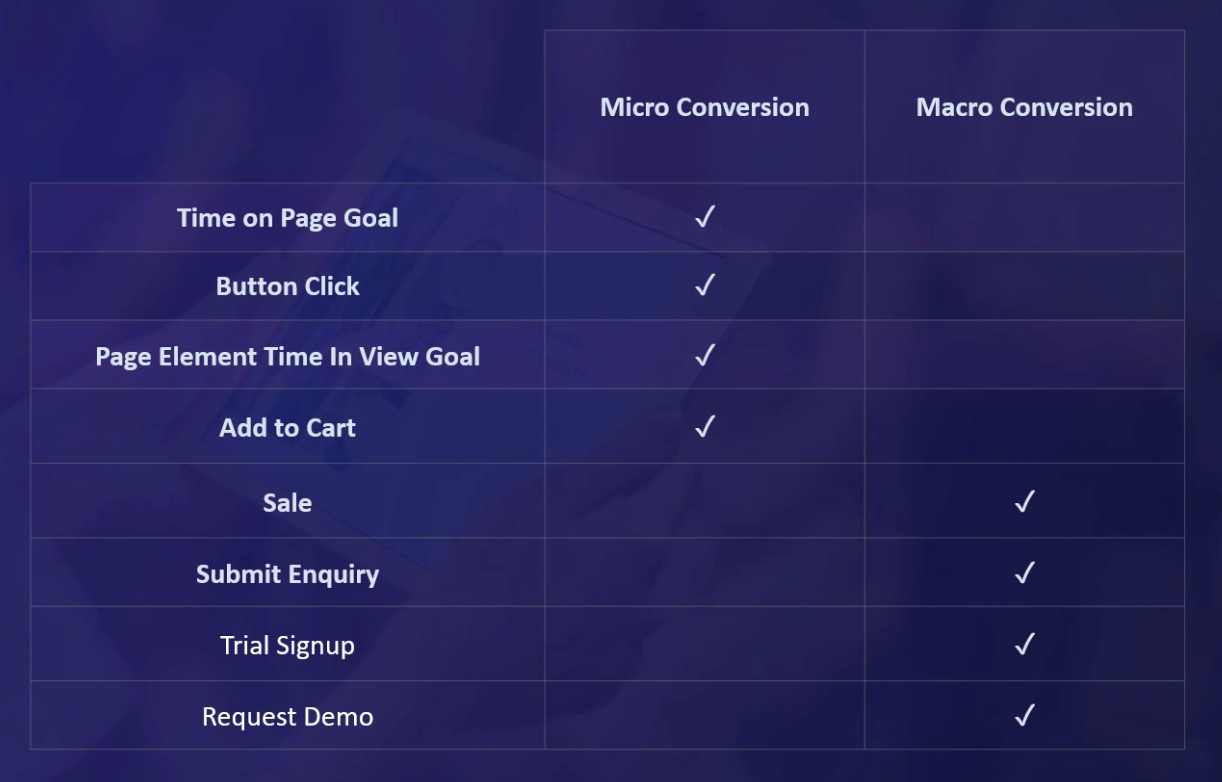
These Micro Conversions can be used for lead scoring, audience creation and measuring landing page success. It basically helps us to understand engagement better.
Before setting up Micro Conversions you should be familiar with Locations. If not, we have a separate video on Locations if you need to get familiar with those first. Locations will be our starting point as we have to link Micro Conversions to a Location because Micro Conversions are based on elements within your website templates.
Setting Micro Conversion Example - Boat Hire Website
In our example we want to trigger a Micro Conversion when website visitors click on a boat listing from search results pages.
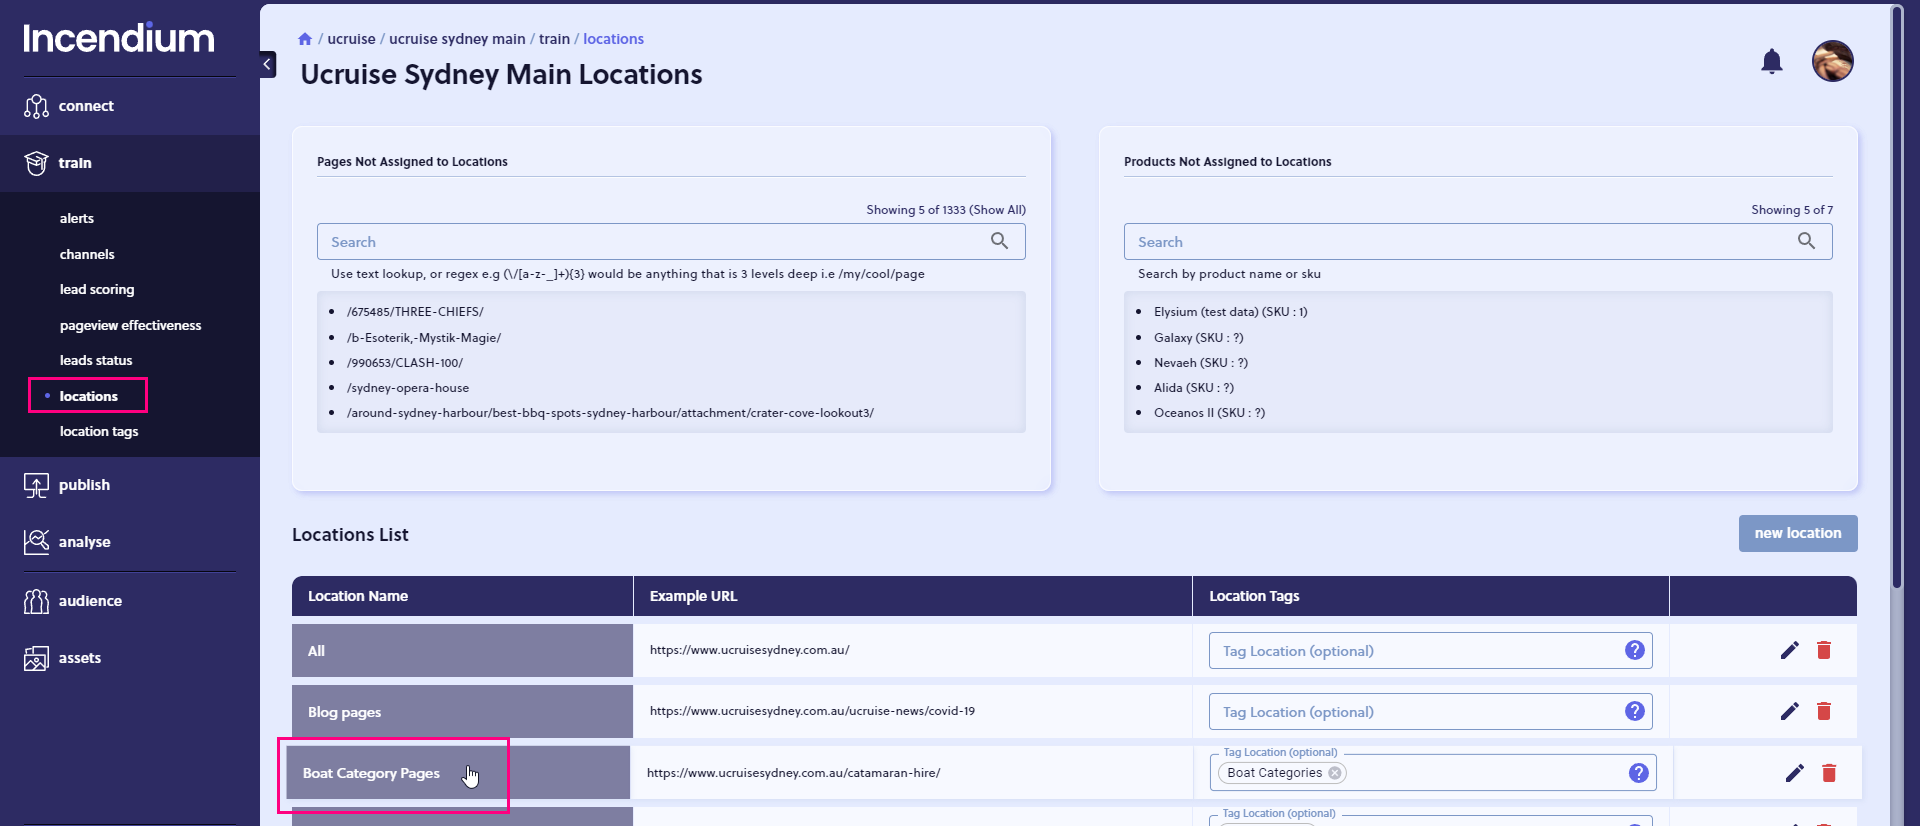
Step 1 - Select Your Location Page
Go to Locations
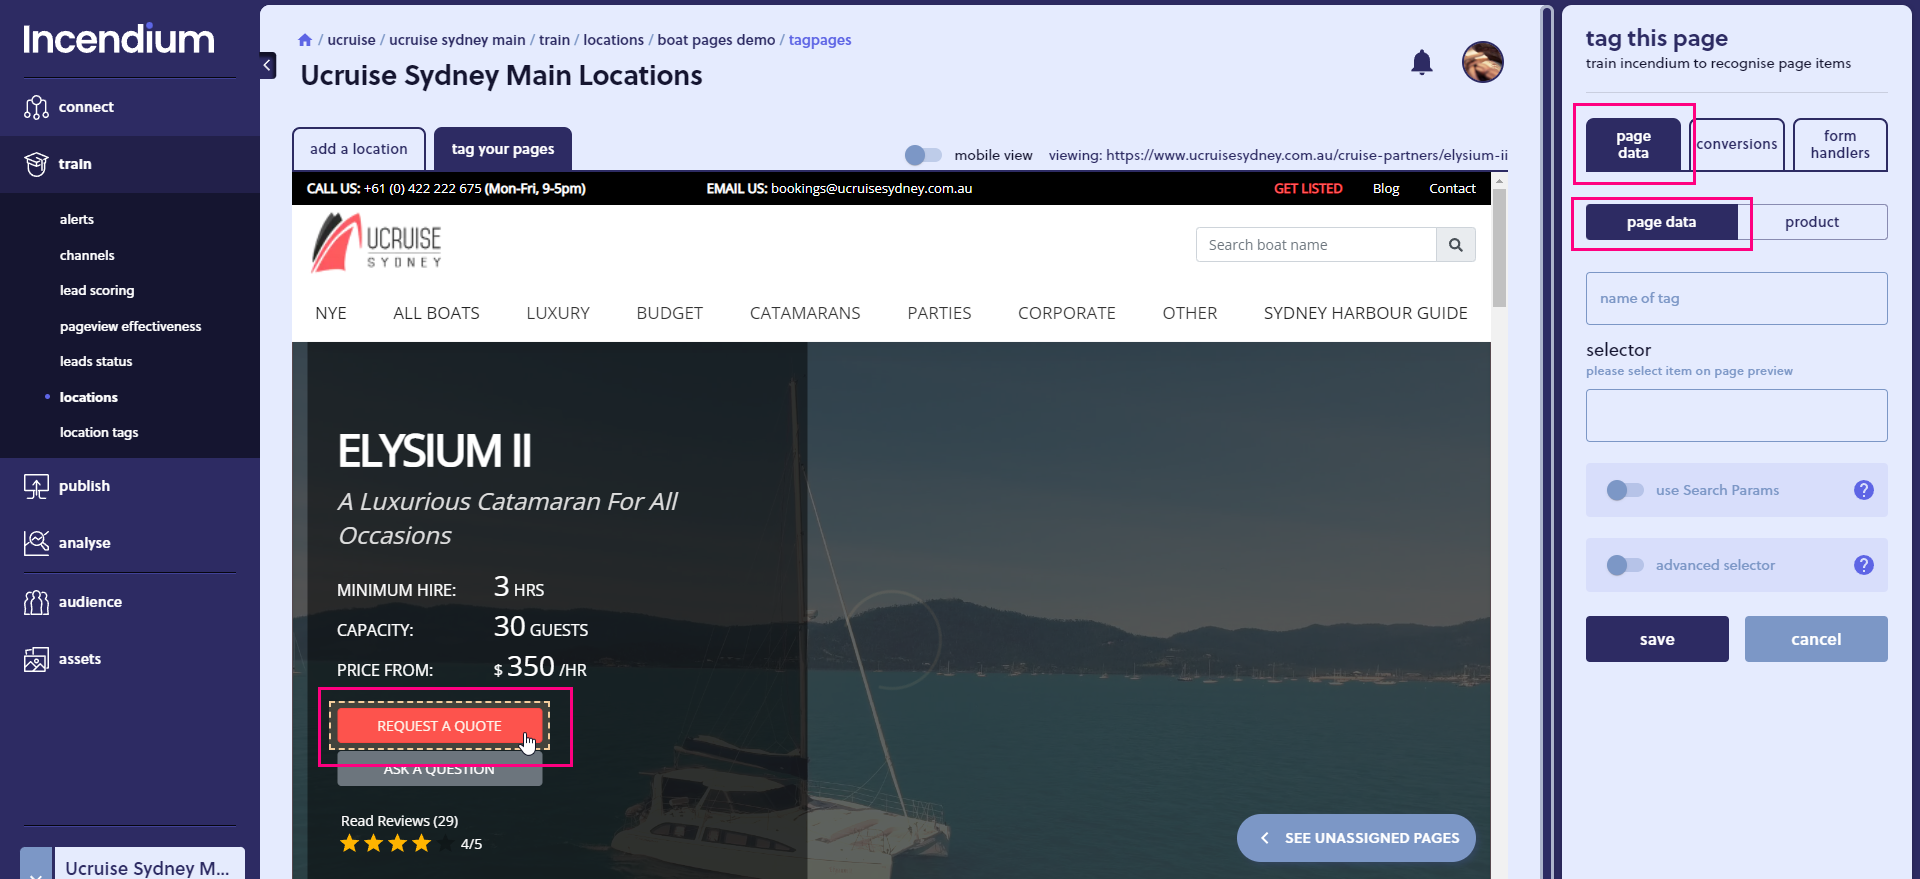
Select the Location page where you want to set up your micro conversion - in this example it's the boat category pages.
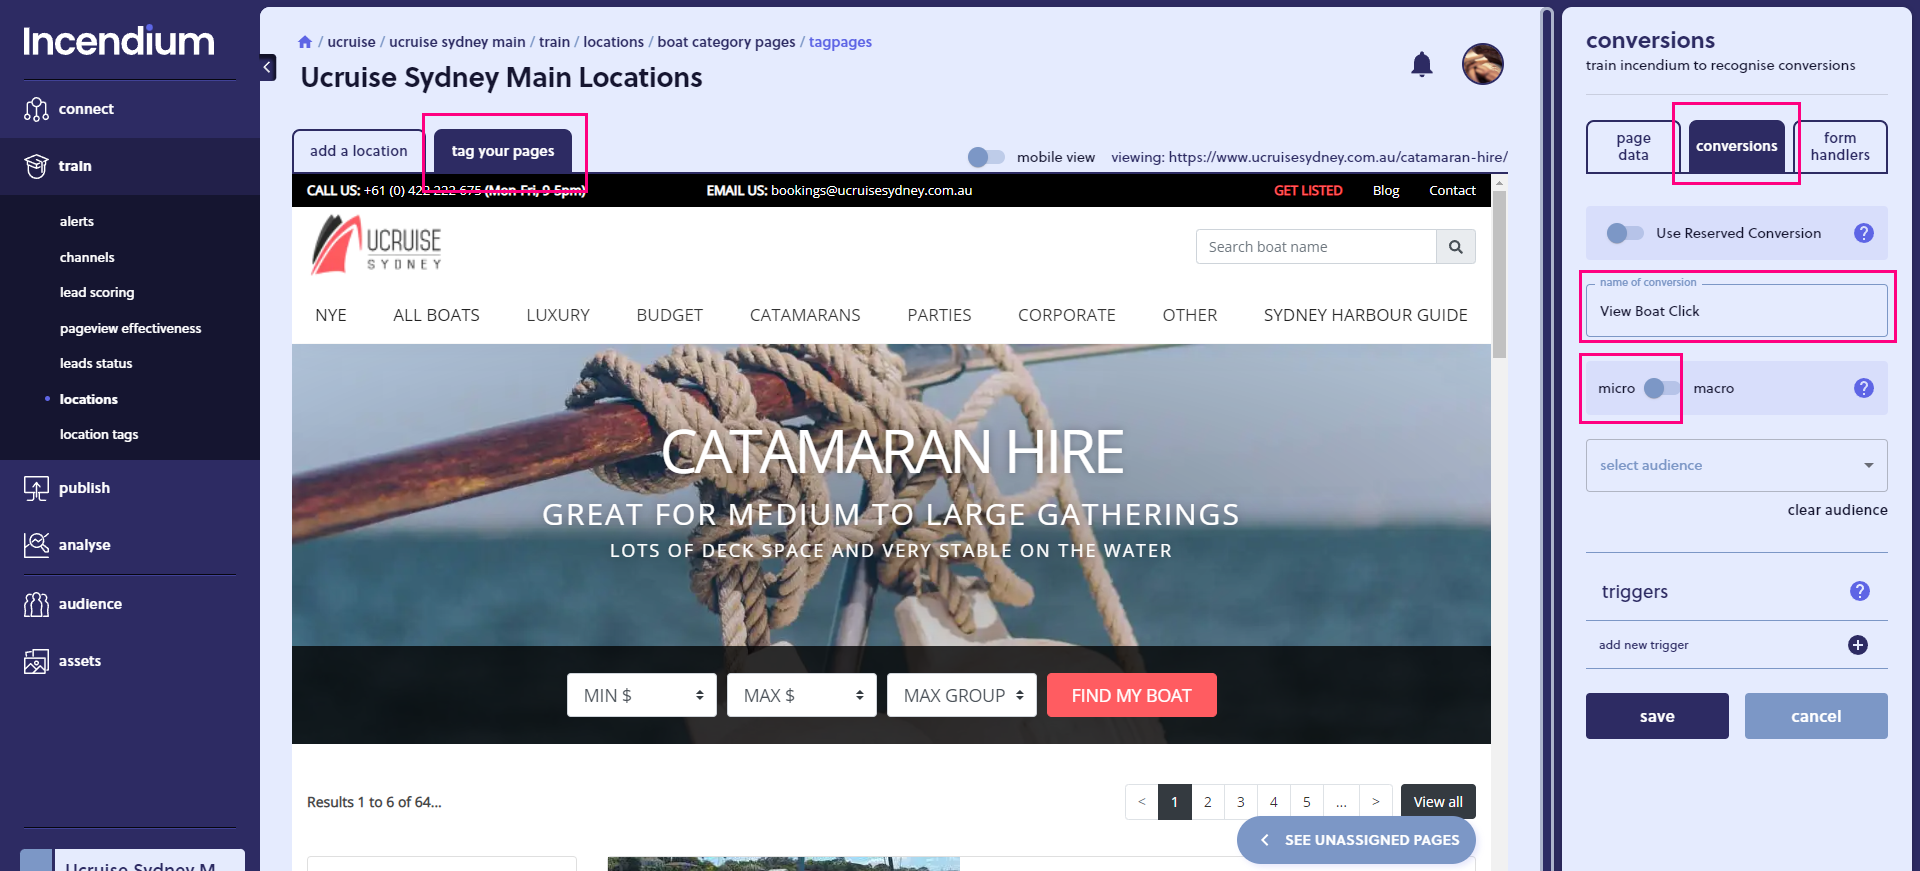
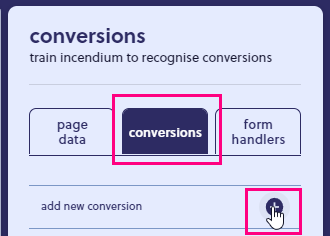
Step 2 - Create Your Conversion
On your Location page, select 'tag your pages', and then on the right hand side menu click on 'conversions' and 'add new conversion', then name the conversion. Ensure 'micro' is selected on the switch. We can also select a conversion type for specific audiences (if we have created them), but for this website we want the conversion to be for all audiences, so nothing needs selecting.
Step 3 - Set Your Conversion Trigger
Select the Trigger type to click (there are several types of trigger).
Click on the 'selector' field and then select the web element you want as your trigger - in this example it's the 'View The Boat' button. To avoid creating numerous triggers for each instance of the same click, we ensure the 'repeated' option is selected on the switch. This needs to be done before clicking on our webpage element trigger.
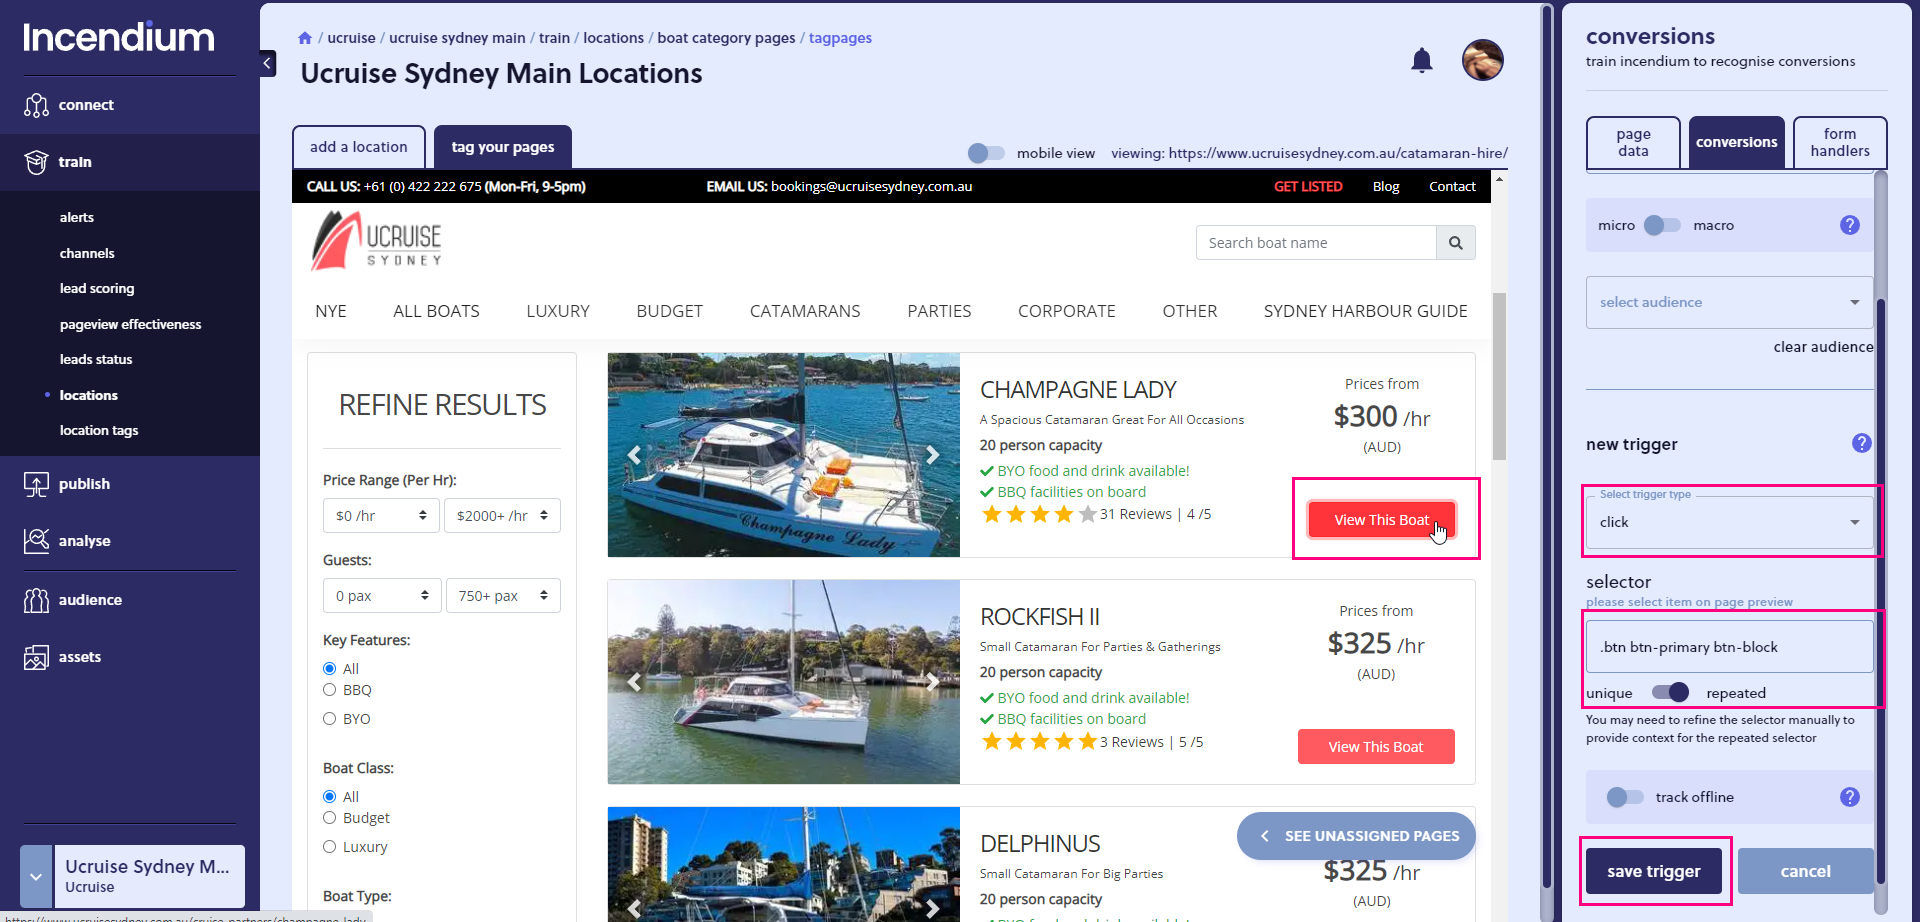
Then click on 'save trigger'.
And that's it!
How to Use This Data
In order to make sense of Micro Conversions and see whether or not they are effective, first Macro Conversions need to be set up. Counting Micro Conversions can only give you basic data outputs; there is not much value generated without any monetizable actions to connect them to. To learn how to set up Macro Conversions click here.
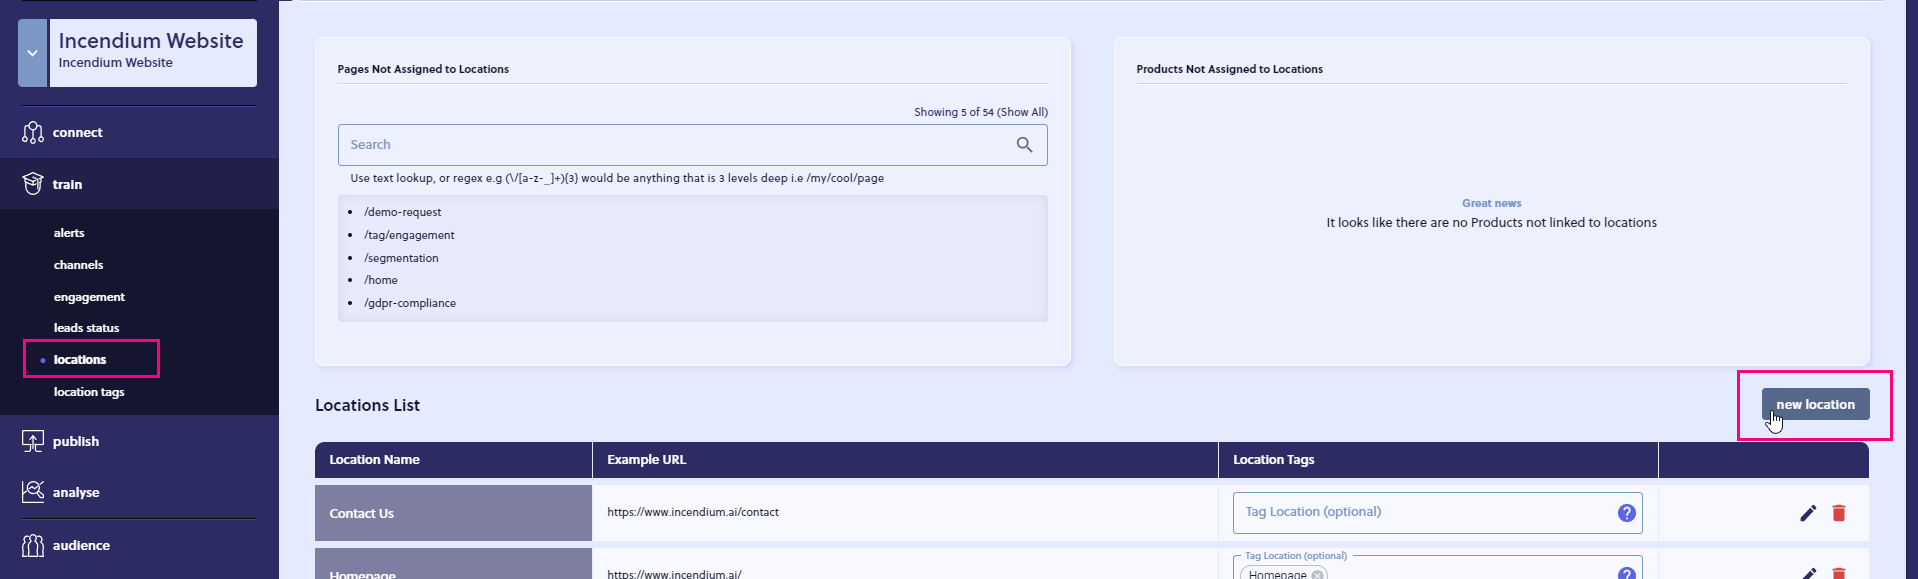
Locations in Incendium are a very simple but powerful concept, and they're quite fundamental to a lot of the functionality within the platform itself. So what are they? Well, a Location is simply a grouping of pages, which can then be used in analytics or for things like personalizations.
You'll notice with most websites you have templates which are similar across different types of pages. You'll have blog pages and certain content category pages, product pages, product category pages and they'll share the same templates.
And therefore, if we want to look at things like the performance of those templates in aggregate will need a grouping for those and that's where our Location set up comes in.
Also, with things like personalization, if we want to launch a change across all of those pages we do that through one of these groupings.
Location Set Up Example - Incendium Website
To set up a Location which groups together all of the Industries pages on the Incendium website. This will allow us to see in analytics If people are enjoying these pages and if they are common part of someone's journey to conversion. Or we can see if they're serving as an entry point to the website for an Organic searches for example.
Step 1
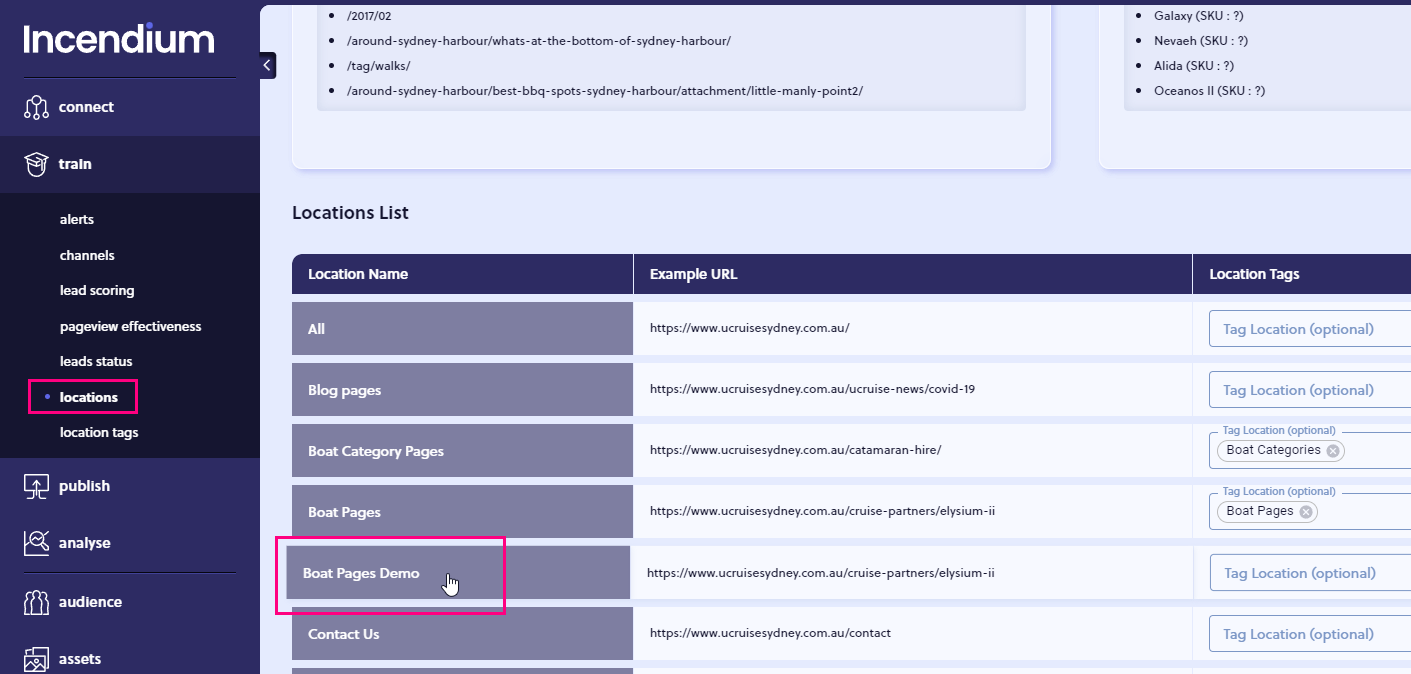
Go to Train -> Locations
Click on 'new location' where you will be taken to the next screen.
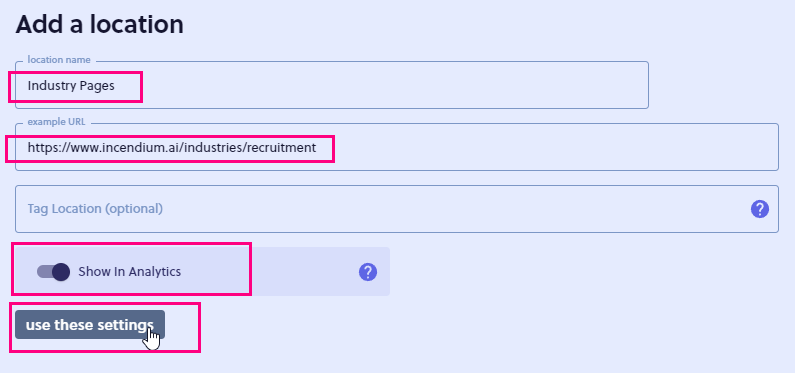
Step 2 - Add New Location
Input a name for the Location and then put in an example URL from the website analytics and then click on 'use these settings'.
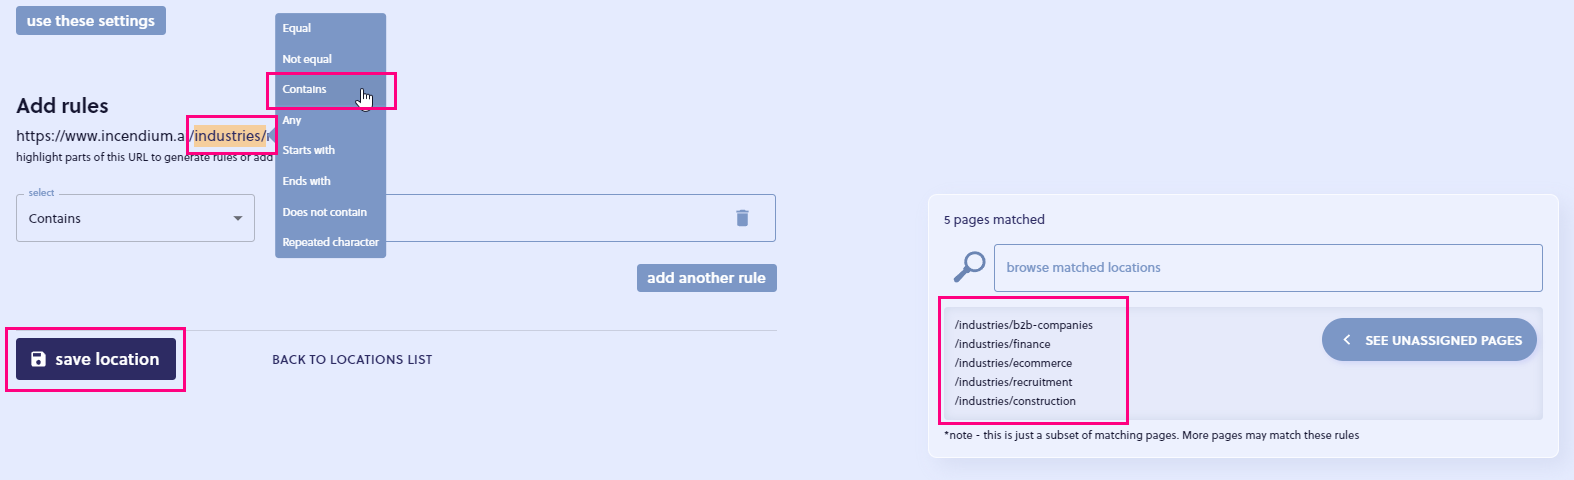
Step 3 - Add Rules
From the URL you entered in the previous step you can select over the part of the URL that can be used to group similar pages, in this example all pages that contain /industries/.
On the right hand side you can check which pages your rule will match to make sure it's capturing them. If it doesn't you can always create additional rules until all pages are captured.
Once all the pages are matched simply click 'save location'.
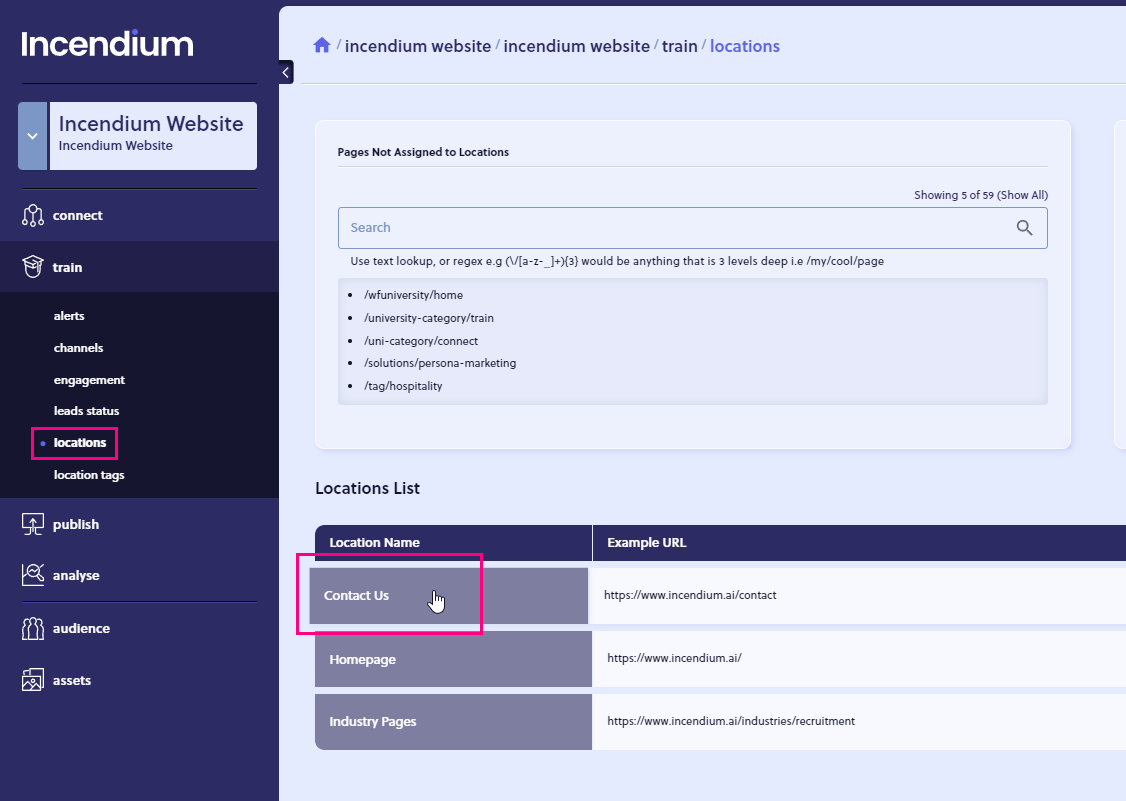
From there you can move onto tagging the page to set up Micro Conversions and Macro Conversions.
If you haven't seen how to set up Micro Conversions it may be worth watching that lesson first before proceeding with this one.
You should also already be familiar with setting Locations in Incendium, again if you haven't yet gone through that lesson, it is advised to start there first before looking into conversions.
What Are Macro Conversions?
Macro conversions record the most important actions on a website, like revenue driving conversions, or enquiries that may be passed on to Sales teams for them to follow up on.
One very powerful feature of Incendium, it that it has the ability to link data from your CRM systems to Macro Conversions, providing really useful end-to-end insights, marrying up online with offline. We'll cover that feature of Incendium in a future lesson, for this lesson however, it will just focus on the basics because Macro Conversions can get quite complicated. In this example, we're going show you how to set up a form submission Macro Conversion.
Step 1 - Choose Location
First we need to select the Location, we're going to choose the Contact Us page on the Incendium website.
Step 2 - Add New Conversion
Select 'conversions' on the right hand side bar, and 'add new conversion'.
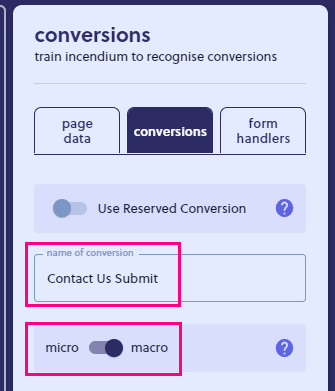
Step 3 - Name The Conversion
We're naming our conversion something that makes sense when using it for reporting and segmentation purposes later.
Due to the conversion being a Macro Conversion type we need to make sure we select 'macro' on the switch.
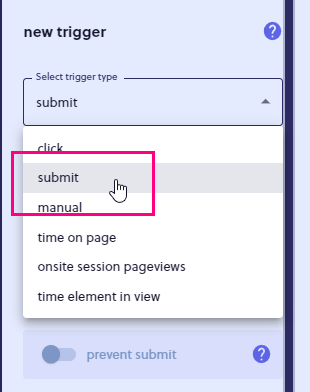
Step 4 - Add The Trigger
Just like with adding a new conversion, here we have to add a new trigger. And then we have to select to the type of trigger, so for our contact form this is a 'submit' trigger.
Step 5 - Click on the Selector
Click on the contact form on the webpage preview and the selector field will add in an ID.
Then simply click 'save trigger' and then also don't forget to click 'save' again to complete the process.
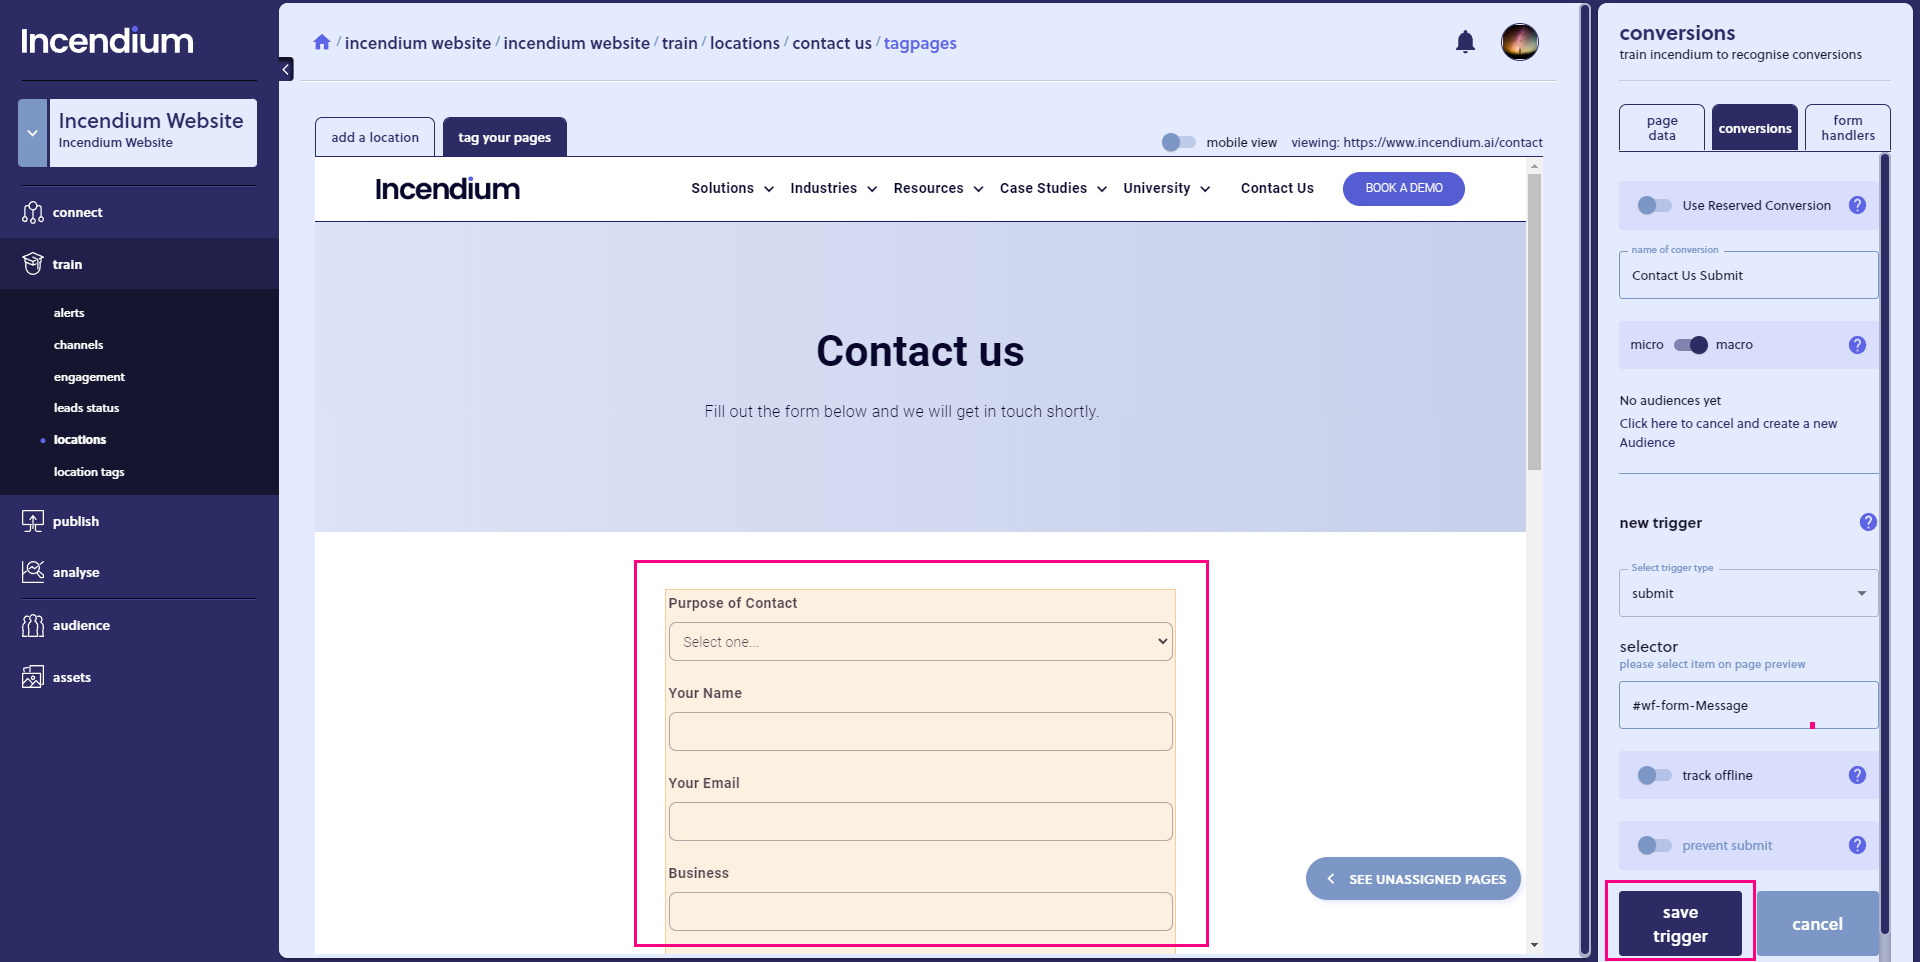
In this example any time the contact form is successfully submitted a Macro Conversion will be counted.
One of the most powerful and unique features of Incendium is the ability to understand page content. This allows us to do some really cool things with analytics, audience, augmentation, and personalization.
For example, looking at this Golf website below, we could point Incendium at all the Product pages of our website (by selecting Product pages from our Locations, as defined previously using the Locations feature). From there we can define where information like product name, product category, price. color, etc, is shown on the page.
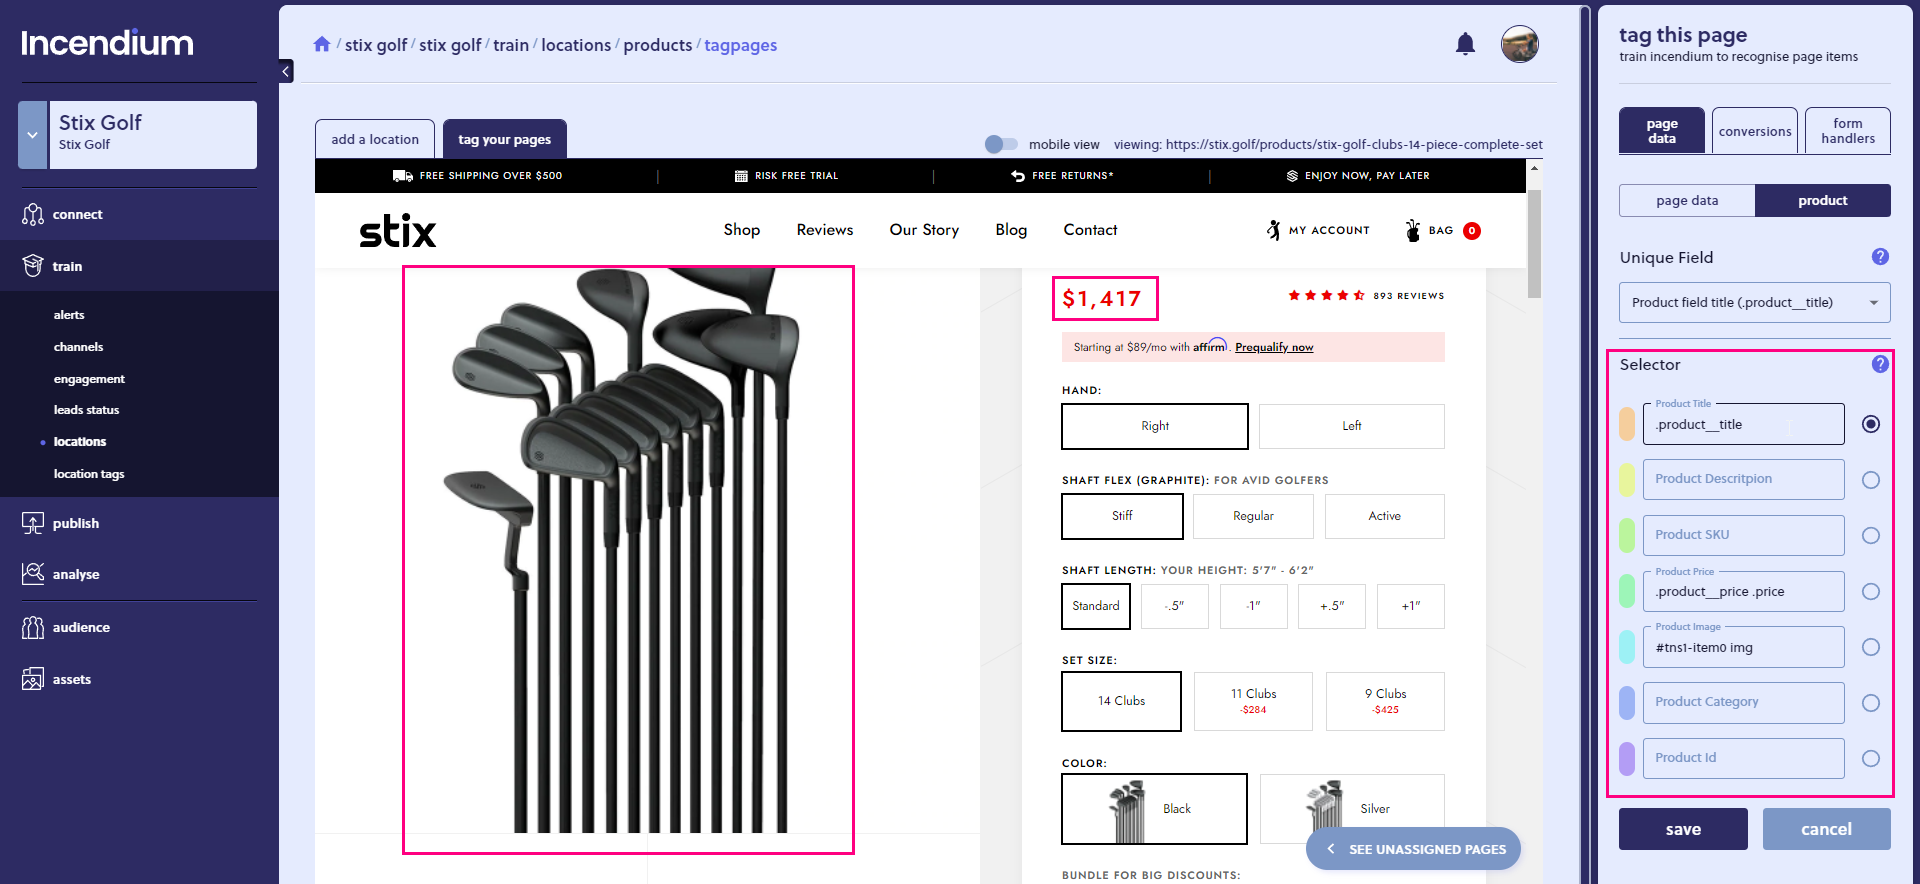
Then when in analytics we would be able to segment our performance reports looking at engagement levels on product pages of, for example, a certain category or within a certain price range.
Using Incendium's Personalization feature (which we cover more in other lessons) we can dynamically change webpage content for pages with certain attributes or for audiences with interests in particular categories. As an example, if a site visitor has been identified (through actions from previous website visits) as someone who normally purchases a specific brand, we can dynamically change the website's homepage to feature thumbnails of products of only that specific brand - not only providing a better user experience but also increasing the likelihood of another sale - What we can do is limited only by our own creativity.
Tagging Webpage Elements Example - Boat Hire Website
Webpage data is information set within a certain template. It can be a single page but it's normally going to be on a group of pages, like blog pages, product pages or category pages. In this example we're going to select the boat listing pages on our boat hire website.
Step 1 - Select The Location
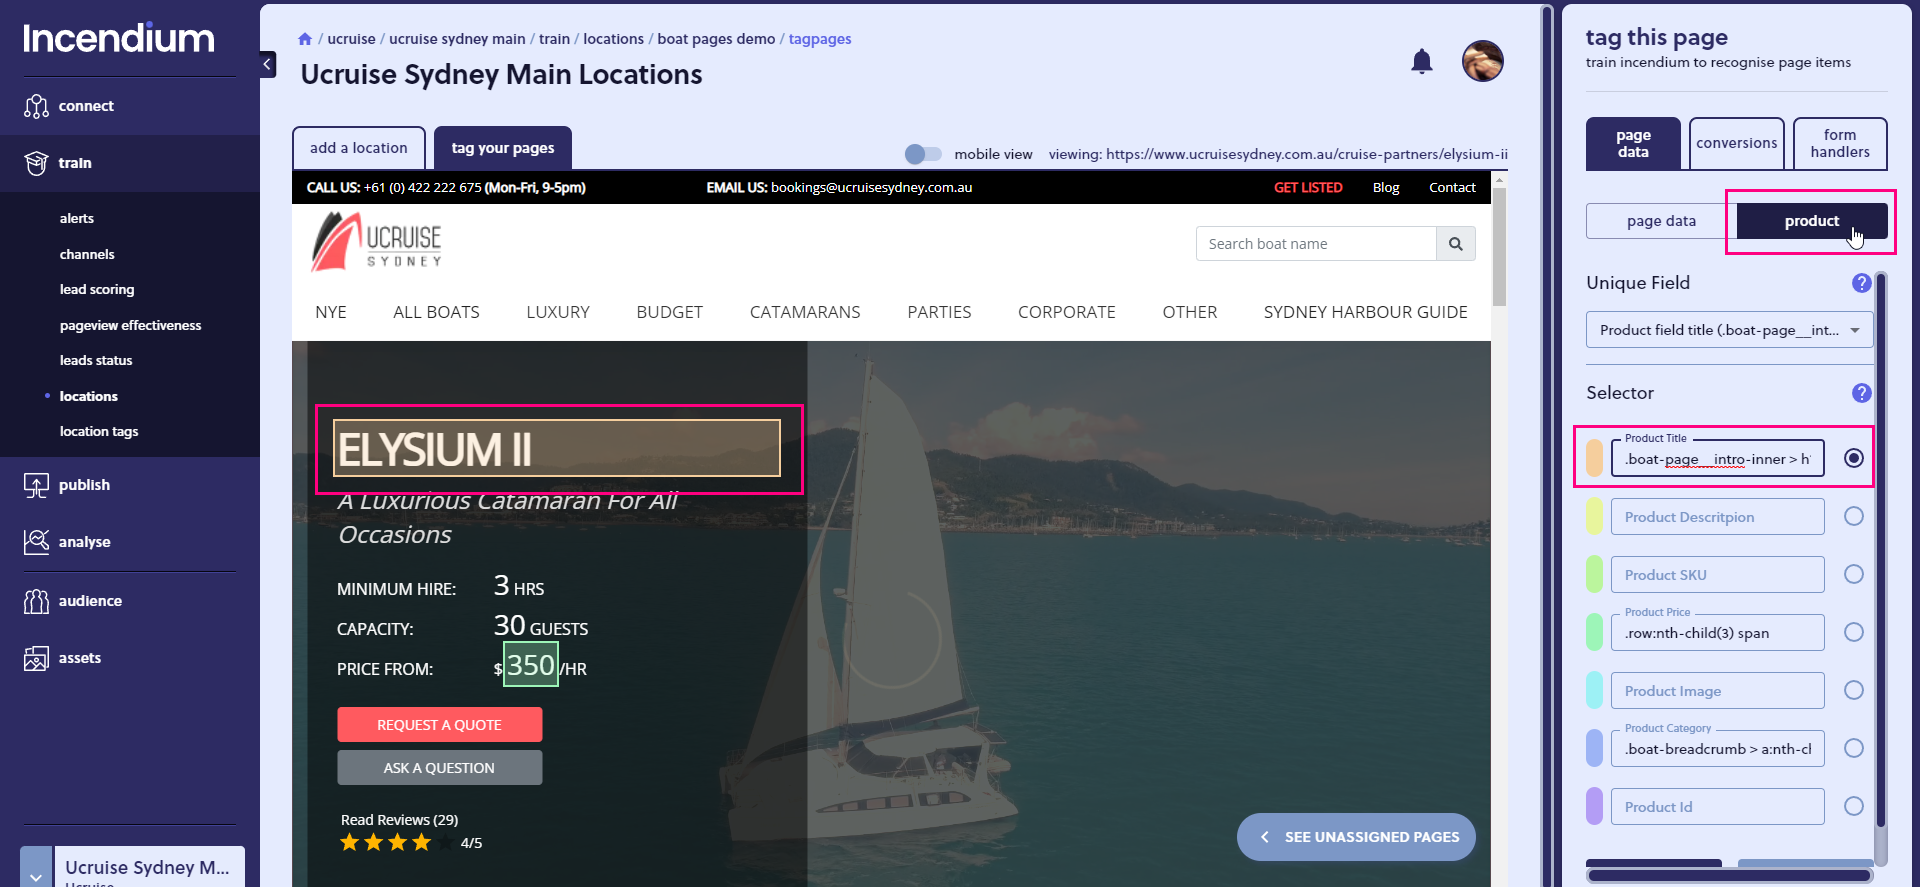
Here we have selected the Boat Pages. These are the pages we want to tag webpage elements on.
Step 2 - Page Data Tagging
As you can see these pages have lots of information like pricing and category; and we just need to tell Incendium what each piece of information is. As long as the other pages in the Location grouping follow the same content structure, Incendium will collect all that data for every page you've made.
When tagging we have free-form, which allows us to select any web element with any name by hovering and just clicking when highlighted.
Or we have the specific product data tagging section. You can use either, but if it's a product page, using the product presets will help Incendium use that data better in Product Reporting.
Adding Unique Fields
Sometimes you won't have all of the data like in this example we don't have an SKU on the page or a suitable description. So here we select a unique identifier. For this website because there is no SKU, we have to use the Title instead, and that's fine as for this website it is a unique field and we can still match up information in reporting via this field.

In this example we've helped Incendium understand the product data on the boat hire website better. In other lessons we will show you how Incendium can use this data.